Showing posts with label for. Show all posts
Showing posts with label for. Show all posts
Saturday, October 25, 2014
Free Bookshare App For Android

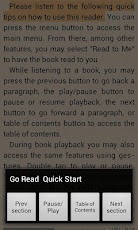
Bookshare recently released Go Read for Android devices. Go Read is the Android version of Bookshares app for iOS call Read2Go. The app is free and compatible with a number of Android 2.2 or higher phones and tablets. Features include direct access to Bookshares library of accessible books, text-to-speech with synced sentence by sentence highlighting and the ability to read ePub books. To learn more about how to become a Bookshare member click here. To download Go Read click here. Click read more below to view screen shoots of Go Read in action.
Monday, October 6, 2014
Advanced English Dicionary AED for Windows 8

Advanced English Dictionary (AED) is the most pleasant dictionary app to use with Windows 8 with more than 4,00,000 entries. It has fast and superp user interface with no confusing option. Though its designed for English (US), you can listen both US & UK Pronunciation. Youll enjoy it for sure. :)
Features & Advantages:
- AED is completely free with Windows 8.
- Definition data stored locally (you can use offline).
- Pronunciation (UK & US) - Internet connection needed.
- Search through Windows Charm!
- Relevant details available for most of the words.
- Pictures are also avilable where necessary.
- Fast & Simple user interface.

Installation:
Maybe this is disappointing for the users who are not using Windows 8. Because this app is designed for Windows 8 and can only be downloaded from Windows Store. You should have access to Windows 8 store to download this app. And you may require Windows live account to download. Also make sure your Windows is activated and you can use the app store properly. Follow the procedure below:
- Connect the the internet.
- Press start and type Advanced English Dictionary.
- In the search location, choose Store.
- Now youll be redirected to Windows Store.
- Find AED from there. It will be in the Books & Reference category.
- Hit on the start button to start download (You may sign in to your hotmail or live ID).
- Wait for the app to be installed. Its 20 MB in size.
How to Use?
Its so easy to operate. A child below 10 years can easily use it. After installing the app, you will find it on your Start Tiles. Hit on it to open the app. Now type any word you want and hit enter.
You will find the details at the right. Even you may find related image at the bottom if available.
Press UK or US button at the top to listen to the pronunciation.
Remember, this is a free app. So ads by Microsoft will be displayed at the right of the screen. And it will consume your net. You can disconnect your net if youd like to stop those ads. But if your net is off, you cant listen the audio.
Stay with Marks PC Solution to get more interesting IT topics!
Thursday, October 2, 2014
Prizmo 2 0 for iOS Released With Cool New Features
 Prizmo 2.0 for iOS was just released in the App Store. Prizmo now works on the iPad as well as the iPhone and iPod Touch. The update includes many exciting new features. The original version of Prizmo included optical character recognition (OCR) but did not include the ability to scan documents to a PDF or text file. The PDF files are not just images but include searchable text. Prizmo 2.0 also allows users to export the documents to other apps.
To create a new document in Prizmo you can simply take a picture of multiple pages. Prizmo will automatically detect the edges of the page. In version 2.0 you no longer have to crop documents manually. Once you have captured all of the pages you can recognize the text of the document which is surprisingly fast and accurate. If the Prizmo does make a mistake you can edit the OCR zones or manually edit the text. After the text has been recognized you can email or export the document as a PDF or text document or read the text using built-in text-to-speech. The text is highlighted as it is read aloud which can be helpful for people with dyslexia Unfortunately you can only read one page of the document at a time using the built-in text-to-speech. In addition, it is important to note that each text-to-speech voice costs $2.99.
Prizmo is still a great tool for quickly reading printed documents using text-to-speech and now is one of the best PDF scanning apps. Most PDF scanning apps such as Scanner Pro only make an image PDF with no text but Prizmo creates PDFs with searchable text.
Prizmo 2.0 includes a new feature to help blind and visually impaired users line-up a document. Because it would be virtually impossible for the blind to take a well aligned picture of a document with out assistance Prizmo voices directions through VoiceOver. If a user has VoiceOver turned on it will tell a blind or visually impaired user which direction to move their device in order to get the perfect shot.
Prizmo is on sale fo $5.99 in the App Store. Click read more below to view screenshots of Prizmo 2.0.


Wednesday, October 1, 2014
Page Setup Printing Tips for MS Excel

Beginners are usually scared while printing from Microsoft Excel. They face problem when setting up page or margin. I had the same problem few years ago. Remember, when you cant do something, never give up. Try to do it with care. You will learn through mistake. Ive just wasted some papers to understand which option does what. And thus I learned how to print excel workbook properly . . . :)
In this post, Im gonna discuss about Page Setup, Margin and Print option of Microsoft Excel. Since Im using version 2010, it will difficult for me to show the related screenshots of 2003 and 2007. But I will try to make it clear for the users of previous versions.
Microsoft Excel 2003:
Before I begin, Id like to say you, upgrade to Office 2010. This is really an amazing version of Microsoft Office. If youre still using 2003 or 2007, youre just missing the magic! Okay lets start -
Page Setup: You should set up your page properly to print a workbook. Otherwise you may get the wrong output. Some lines of your workbook might be missing.
Find the Page Setup option from the File menu. Now go to the Page tab. Set your Orientation - Portrait or Landscape. Choose Paper Size - A4/ Letter/ Legal as your need.
Now move to the Margin tab. Set your margin for Top, Bottom, Left & Right. Then hit OK.
Look at your workbook. Now you will be able to see the boundary of your workbook. Each page will have a boundary. If any part of your workbook is out of this boundary, it will be printed in the next page. So, if you need to adjust your text, you must follow this boundary. If a minor portion of your workbook is out of this boundary, you can reduce your margin to increase the printing area.

Print: Look at the image below:

Print Range: If you choose All, everything in the current workbook will be printed. Nobody usually do so. We will use the Print What option. If you need to print a particular part of your workbook, just select it. Then press Ctrl + P and Choose Selection. Hit on the OK button.
If you can manage to set your contents in a single page (within a boundary) then you can go to the Print Range option. Then select Page(s) box. Type 1 to 1 in the From and To box. Hit OK. Thats it.
Microsoft Excel 2007 & 2010:
Except some new features, Office 2007 and 2010 have got almost similar interface. Page setup and printing option is almost same in both versions. I guess you all are able to set up page and margin in Excel.
In ribbon interface, you will get the Page Setup option under Page Layout Tab. Click at the right bottom corner to get the Page Setup Dialogue box. Now set up page and margin as you need.
Print: Look at the image below to set up the print options:

Though the interface is quite different from that of Excel 2003, the options are almost similar. You can choose Active Sheet or Selection or Page Range. Nothing is confusing. You can get this dialogue options by pressing Ctrl + P. And these options are same in both 2007 and 2010.
If you wanna print a particular part of your workbook, just select that part and then press Ctrl + P > Choose Selection > Print.
Whats New in Excel 2010?
At the beginning, I said youre missing magic! Whats this? Im sharing a little example with you. In 2010, you have the Page Layout View like Word!
You know what is page layout view? Or can you guess? Excel 2010 lets you divide your sheet into different pages. This is somewhat similar to the pages of MS Word. If you divide your sheet into pages, you will never be confused while printing a document! Look at the image below to do it:

When you run Excel, the default mode is Normal. To activate the page layout option, you have to go to the right bottom corner. There you will get the zoom option. And just left to the zoom option, you will get Normal, Page Layout and Page Break Preview button. The middle button is Page Layout.
Page Setup: You should set up your page properly to print a workbook. Otherwise you may get the wrong output. Some lines of your workbook might be missing.
Find the Page Setup option from the File menu. Now go to the Page tab. Set your Orientation - Portrait or Landscape. Choose Paper Size - A4/ Letter/ Legal as your need.
Now move to the Margin tab. Set your margin for Top, Bottom, Left & Right. Then hit OK.
Look at your workbook. Now you will be able to see the boundary of your workbook. Each page will have a boundary. If any part of your workbook is out of this boundary, it will be printed in the next page. So, if you need to adjust your text, you must follow this boundary. If a minor portion of your workbook is out of this boundary, you can reduce your margin to increase the printing area.
Print: Look at the image below:
Print Range: If you choose All, everything in the current workbook will be printed. Nobody usually do so. We will use the Print What option. If you need to print a particular part of your workbook, just select it. Then press Ctrl + P and Choose Selection. Hit on the OK button.
If you can manage to set your contents in a single page (within a boundary) then you can go to the Print Range option. Then select Page(s) box. Type 1 to 1 in the From and To box. Hit OK. Thats it.
Microsoft Excel 2007 & 2010:
Except some new features, Office 2007 and 2010 have got almost similar interface. Page setup and printing option is almost same in both versions. I guess you all are able to set up page and margin in Excel.
In ribbon interface, you will get the Page Setup option under Page Layout Tab. Click at the right bottom corner to get the Page Setup Dialogue box. Now set up page and margin as you need.
Print: Look at the image below to set up the print options:
Though the interface is quite different from that of Excel 2003, the options are almost similar. You can choose Active Sheet or Selection or Page Range. Nothing is confusing. You can get this dialogue options by pressing Ctrl + P. And these options are same in both 2007 and 2010.
If you wanna print a particular part of your workbook, just select that part and then press Ctrl + P > Choose Selection > Print.
Whats New in Excel 2010?
At the beginning, I said youre missing magic! Whats this? Im sharing a little example with you. In 2010, you have the Page Layout View like Word!
You know what is page layout view? Or can you guess? Excel 2010 lets you divide your sheet into different pages. This is somewhat similar to the pages of MS Word. If you divide your sheet into pages, you will never be confused while printing a document! Look at the image below to do it:
When you run Excel, the default mode is Normal. To activate the page layout option, you have to go to the right bottom corner. There you will get the zoom option. And just left to the zoom option, you will get Normal, Page Layout and Page Break Preview button. The middle button is Page Layout.
Stay with Marks PC Solution to get more interesting IT topics!
Monday, September 29, 2014
Zip Repair or RAR File Repair Solution for an Error “This is not a valid win32 application”
WinZip and WinRAR are the most important and widely used software to compress file. These tools have excellent compression capabilities due to this WinZip and WinRar are most in the demand from all over the Globe. Once we compress the files then we can get more storage space in the hard disk. User can send large files as attachment through email very easily after compressing the large file with WinZip and WinRAR tools. But sometimes these compressed files get corrupt due to several reasons and users get few errors while accessing compressed .zip or .RAR files. To repair these corrupted Zip files it is important to use Zip Repair tools.
Cause: There are several reasons due to which compressed files (.zip or .rar) may get corrupt few are as follows:
- Due to virus attack
- Improper System Shutdown
- Improper Download etc.
If zip files affected by any of above written reason then it is possible to face these written errors.
- "Cannot open file: it does not appear to be a valid archive"
- "This is not a valid win32 application or Corrupt Zip file"
- "CRC Errors"
Solution: To solve above written errors user can try Inbuild Repair Utility of WinRAR. But this repair utility works when compressed file is not heavily damaged.
Here I am sharing few important steps to repair .ZIP/.RAR files using WinRAR:
- Open WinRAR and browse to the folder with your .rar/.zip file.
- Highlight the file and click the Repair button from the tool bar.
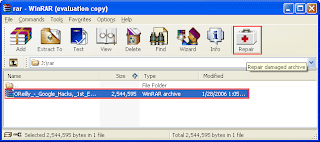
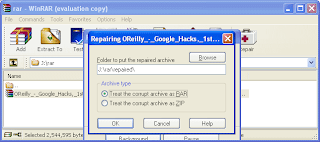
- Now a popup windows will appear which have two options, select “Treat the corrupt archive as ZIP" or “Treat the corrupt archive as RAR” depending which type of archive you want to repair.
- You may get a "Suspicious Entry" pop-up. If so, select all. This may happen several times while repairing.
- Click on Close, after WinRAR has completed repairing the archive.
- To extract your file, highlight your new rebuilt archive.
- Next select Commands > Extract without confirmation
- The files will start extracting.
- The archived files will be extracted to the specified folder as the repaired archive.
Essential Run Commands for Windows
Most of the windows users are familiar with run commands. We often use run for different purposes. There are a large number of run commands available. Even I myself dont know how much run commands are available. Most importantly, run commands are subject to change and manipulation. So better you go only for the essential commands only.
Here I am gonna suggest you some important commands that you often need to use:
Read more »
Here I am gonna suggest you some important commands that you often need to use:
Command | Result |
| appwiz.cpl | Add/Remove Programs |
| calc | Calculator |
| chkdsk | Check Disk Utility |
| control | Control Panel |
| cmd or cmd.exe | Command Prompt |
| Downloads | Sow download folder |
| dxdiag | Direct X Troubleshooter |
| cleanmgr | Disk Cleanup Utility |
| dfrgui | Defragment User Interface |
| diskmgmt.msc | Disk Management |
| diskpart | Disk Parmelonion Manager |
| desk.cpl | Display Properties |
| dpiscaling | DPI Scaling |
| control folders | Folders Properties |
| fonts | Manage fonts |
| gpedit.msc | Group Policy Editor |
| iexplore | Internet Explorer |
| firefox | Firefox |
| control keyboard | Keyboard Properties |
| main.cpl or control mouse | Mouse Properties |
| mspaint | Microsoft Paint |
| control netconnections ncpa.cpl | Network Connections |
| notepad | Notepad |
| osk | On Screen Keyboard |
| perfmon | Performance Monitor |
| powercfg.cpl | Power Configuration |
| regedit.exe | Registry Editor |
| msinfo32 | System Information |
| msconfig | System Configuration Utility |
| taskmgr | Task Manager |
| firewall.cpl | Windows Firewall |
| wf.msc | Windows Firewall with Advanced Security |
| write | Wordpad |
| wmplayer | Windows Media Player |
NB: Press Windows Key + R to activate run.
Remember: The above command is for windows vista, 7 and 8. Though most of the commands works fine on XP too. Few of them may not work on XP.
Awesome Online Visitor Counter for Your Site!

Wanna place a gadget in your site like this? Its very simple and easy. But you must complete a few steps to make it.
- First, visit http://www.99counters.com/ and sign up for free.
- If youre asked to confirm the account then confirm it.
- Then click on Create a Counter.
- Choose Theme, Counter Name and Time Zone.
- Now hit on Save.
- Then youll get Counter Code in the object embed code. Copy the code (Ctrl+C) and place it in your site. Im showing the system for blogger blog.
- Now sign in to your blogger account.
- Go to Design > Layout > Add a Gadget > HTML/JavaScript>Paste the code in the Content Box and hit on Save.
- Now view your site.
See the Demo below
Stay with Marks PC Solution to get more interesting IT topics!
Sunday, September 28, 2014
How to Create a Custom Toolbar for Website
A customized toolbar of your blog or website may increase visitors loyalty. If they found your toolbar useful they can use it in browser. And this is also important for your sites ranking. There may be hundred ways to build a toolbar. Some of them are free or some may be premium.
For creating toolbar, my personal choice is Alexa. Why?
- Because its free and easy to use.
- You can easily monitor the usage statistics.
- And most importantly, alexa is a ranking site. It measures websites ranking from 1 to the last.
- Alexa considers the site most that has its toolbar and widget in the page.
Lets build a toolbar now.
1. First go to the Alexa and register an account. It takes 2 or 3 minutes. If you already have
an account then proceed to the next step.
an account then proceed to the next step.
2. Now go to the toolbar creator page.
3. A pop up window will ask you to enter the toolbar name. Type the name or skip it.
You can write a name later.
You can write a name later.

4. Now look at the image below. Here you can edit toolbar name and choose a logo.

5. Have a look at the Add buttons that drive traffic to your website. There are 4 buttons.
Only add the buttons that is necessary for you. Because you cant add
all the buttons due to the space limitations.
6. Now move to the Add social networking buttons section. Add only the first 2 buttons.
Show tweets button is not necessary. Click Next.
7. Add buttons for things that your users do everyday. This is the most useful part for
the users. I recommend you to add the Personal Twitter and Gmail button. Click Next.
the users. I recommend you to add the Personal Twitter and Gmail button. Click Next.
8. This step let you add an icon for the toolbar. You can either choose an icon made earlier
or use the default. I prefer to use the custom image. Click Next.
or use the default. I prefer to use the custom image. Click Next.

Youre almost done. Publish it to make the toolbar available for download. But how can your visitors will get it?
Go to the dashboard and click on your toolbar. Then youll find different shapes and colors. Choose the color and shape as your choice from step 1 and 2. Then add a HTML gadget in your blog by the html code from the step 3. Place the gadget in a part of the page where the visitor can easily find it.

Currently the alexa toolbar works with Chrome, Firefox and IE. Hope it will support more browsers in the future.
Have a look at the sample toolbar below:
| Click to enlarge |
If you have any query regarding toolbar creator then leave a comment.
Stay with Marks PC Solution to get more interesting IT topics!
Nook App for iOS Updated to Support VoiceOver and Zoom

Great news, the Nook app for iPhone, iPad, and iPod Touch is now accessible to the blind, visually impaired and people with print disabilities. The updated app now supports VoiceOver and Zoom. VoiceOver and Zoom are built in accessibility features in iOS. To learn more about VoiceOver click here. With VoiceOver you can have the book read aloud using text-to-speech. Oddly enough the update makes the Nook app more accessible than current Nooks. Serious kudos to Barns & Nobles for making their app accessible. To download the app for free click here.
Click read more below to view more screenshots.


Saturday, September 27, 2014
Kindle App for iOS and Android Adds Whispersync for Voice

 Amazons Kindle app for iOS and Android was recently updated to integrate audio books from Audible. The update, which is available for free, allows users to seamlessly switch between reading the Kindle text version of a book to listening to the Audible audio version of a book. For example, if you read part of the book and then switch to the audio version the recording will pickup right where you left off. The new feature even allows users to listen to the audio book while following along with the text version. Audio speaking rate can be increased or decreased according to user preference. Unfortunately, unlike Immersion Reading on Kindle Fire tablets, the Kindle app for iOS and Android does not highlight the text as it is being read allowed. While this may not be an inconveniences for some users, it could be a major omission for users with tracking difficulty. For now, users will need a Kindle Fire tablet to take advantage of the full Immersion Reading experience. To learn more about Immersion Reading click here. There is one another major caveat: price. In order to take advantage of Whispersync for Voice or Immersion Reading on a Kindle Fire, you must purchases both the Kindle and Audible versions of a book. This can become extremely expensive for the occasional reader let alone a book worm.
To download the app for iOS click here and to download the app for Android click here. To view screenshots of the app in action click read more below.


G Form Extreme Sleeve Provides Protection For Your Important Devices
The G-Form Extreme Sleeve is soft and flexible while still protecting your devices. As the school year gets underway it is important protect your electronics from the daily bumps and drops that are inevitable for school children. I tested the G-Form Extreme Sleeve 2, but I did not do any extreme tests that would have put my iPad in jeopardy. That being said the construction and feel of case gives me confidence that the protected device would survive daily falls and bumps. I would be slightly concerned if the iPad or other device fell on its corner because the padding seems slightly thinner on the edges. The case is available in black and bright yellow depending on your preferences. The G-Form Extreme Sleeve comes in a number of sizes ranging from 7 inch tablet to 17 inch laptop. If youre sending your child to school with expensive electronic devices I definitely think that the G-Form Extreme Sleeves are a worthy investment. The cases range in price from $60 to $100 depending on the size. To learn more or to order a case click here to visit the G-Form website.
Click here to view images of the G-Form Extreme Sleeve 2.


Product was provided complimentary to reviewer.
Subscribe to:
Posts (Atom)