Wednesday, October 1, 2014
Page Setup Printing Tips for MS Excel

Beginners are usually scared while printing from Microsoft Excel. They face problem when setting up page or margin. I had the same problem few years ago. Remember, when you cant do something, never give up. Try to do it with care. You will learn through mistake. Ive just wasted some papers to understand which option does what. And thus I learned how to print excel workbook properly . . . :)
In this post, Im gonna discuss about Page Setup, Margin and Print option of Microsoft Excel. Since Im using version 2010, it will difficult for me to show the related screenshots of 2003 and 2007. But I will try to make it clear for the users of previous versions.
Microsoft Excel 2003:
Before I begin, Id like to say you, upgrade to Office 2010. This is really an amazing version of Microsoft Office. If youre still using 2003 or 2007, youre just missing the magic! Okay lets start -
Page Setup: You should set up your page properly to print a workbook. Otherwise you may get the wrong output. Some lines of your workbook might be missing.
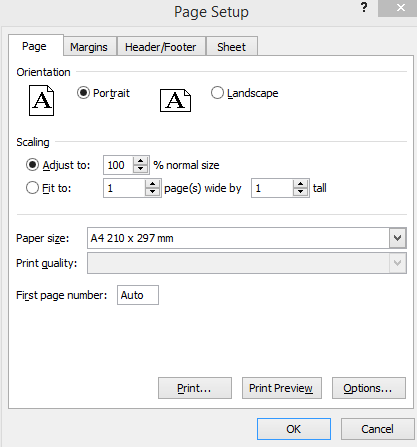
Find the Page Setup option from the File menu. Now go to the Page tab. Set your Orientation - Portrait or Landscape. Choose Paper Size - A4/ Letter/ Legal as your need.
Now move to the Margin tab. Set your margin for Top, Bottom, Left & Right. Then hit OK.
Look at your workbook. Now you will be able to see the boundary of your workbook. Each page will have a boundary. If any part of your workbook is out of this boundary, it will be printed in the next page. So, if you need to adjust your text, you must follow this boundary. If a minor portion of your workbook is out of this boundary, you can reduce your margin to increase the printing area.

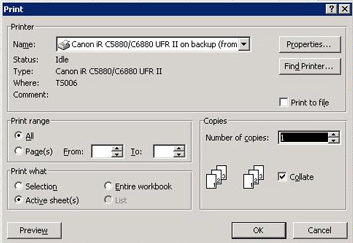
Print: Look at the image below:

Print Range: If you choose All, everything in the current workbook will be printed. Nobody usually do so. We will use the Print What option. If you need to print a particular part of your workbook, just select it. Then press Ctrl + P and Choose Selection. Hit on the OK button.
If you can manage to set your contents in a single page (within a boundary) then you can go to the Print Range option. Then select Page(s) box. Type 1 to 1 in the From and To box. Hit OK. Thats it.
Microsoft Excel 2007 & 2010:
Except some new features, Office 2007 and 2010 have got almost similar interface. Page setup and printing option is almost same in both versions. I guess you all are able to set up page and margin in Excel.
In ribbon interface, you will get the Page Setup option under Page Layout Tab. Click at the right bottom corner to get the Page Setup Dialogue box. Now set up page and margin as you need.
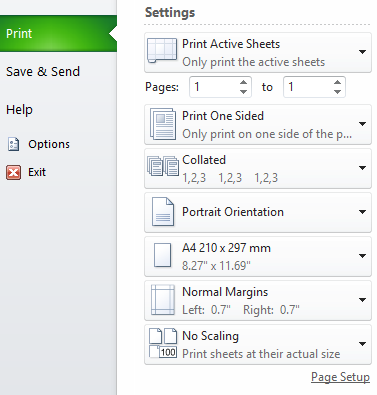
Print: Look at the image below to set up the print options:

Though the interface is quite different from that of Excel 2003, the options are almost similar. You can choose Active Sheet or Selection or Page Range. Nothing is confusing. You can get this dialogue options by pressing Ctrl + P. And these options are same in both 2007 and 2010.
If you wanna print a particular part of your workbook, just select that part and then press Ctrl + P > Choose Selection > Print.
Whats New in Excel 2010?
At the beginning, I said youre missing magic! Whats this? Im sharing a little example with you. In 2010, you have the Page Layout View like Word!
You know what is page layout view? Or can you guess? Excel 2010 lets you divide your sheet into different pages. This is somewhat similar to the pages of MS Word. If you divide your sheet into pages, you will never be confused while printing a document! Look at the image below to do it:

When you run Excel, the default mode is Normal. To activate the page layout option, you have to go to the right bottom corner. There you will get the zoom option. And just left to the zoom option, you will get Normal, Page Layout and Page Break Preview button. The middle button is Page Layout.
Page Setup: You should set up your page properly to print a workbook. Otherwise you may get the wrong output. Some lines of your workbook might be missing.
Find the Page Setup option from the File menu. Now go to the Page tab. Set your Orientation - Portrait or Landscape. Choose Paper Size - A4/ Letter/ Legal as your need.
Now move to the Margin tab. Set your margin for Top, Bottom, Left & Right. Then hit OK.
Look at your workbook. Now you will be able to see the boundary of your workbook. Each page will have a boundary. If any part of your workbook is out of this boundary, it will be printed in the next page. So, if you need to adjust your text, you must follow this boundary. If a minor portion of your workbook is out of this boundary, you can reduce your margin to increase the printing area.

Print: Look at the image below:

Print Range: If you choose All, everything in the current workbook will be printed. Nobody usually do so. We will use the Print What option. If you need to print a particular part of your workbook, just select it. Then press Ctrl + P and Choose Selection. Hit on the OK button.
If you can manage to set your contents in a single page (within a boundary) then you can go to the Print Range option. Then select Page(s) box. Type 1 to 1 in the From and To box. Hit OK. Thats it.
Microsoft Excel 2007 & 2010:
Except some new features, Office 2007 and 2010 have got almost similar interface. Page setup and printing option is almost same in both versions. I guess you all are able to set up page and margin in Excel.
In ribbon interface, you will get the Page Setup option under Page Layout Tab. Click at the right bottom corner to get the Page Setup Dialogue box. Now set up page and margin as you need.
Print: Look at the image below to set up the print options:

Though the interface is quite different from that of Excel 2003, the options are almost similar. You can choose Active Sheet or Selection or Page Range. Nothing is confusing. You can get this dialogue options by pressing Ctrl + P. And these options are same in both 2007 and 2010.
If you wanna print a particular part of your workbook, just select that part and then press Ctrl + P > Choose Selection > Print.
Whats New in Excel 2010?
At the beginning, I said youre missing magic! Whats this? Im sharing a little example with you. In 2010, you have the Page Layout View like Word!
You know what is page layout view? Or can you guess? Excel 2010 lets you divide your sheet into different pages. This is somewhat similar to the pages of MS Word. If you divide your sheet into pages, you will never be confused while printing a document! Look at the image below to do it:

When you run Excel, the default mode is Normal. To activate the page layout option, you have to go to the right bottom corner. There you will get the zoom option. And just left to the zoom option, you will get Normal, Page Layout and Page Break Preview button. The middle button is Page Layout.
Stay with Marks PC Solution to get more interesting IT topics!
Subscribe to:
Post Comments (Atom)
No comments:
Post a Comment
Note: Only a member of this blog may post a comment.